Hey samsung sm-j701f users, if you looking for a solutions of Samsung SM-J701F Touch not working after update 8.1.0 then you are here on the right place to solve your problems, Samsung SM-J701F after update 8.0 too many users facing touch not working issue to their device, so guys just follow this method if you also face this issue then after successfully following this method you will successfully repair your device.
Let’s start to fix Samsung SM-J701F Touch not working after update problem
-Now Samsung pushed all the latest updates on their devices, after update to the latest version some of the Samsung J701F devices faces touch not working problems to their devices,
-If you want to know the right and actual way to solve the problem, then you need some things to do it, so without wasting any time follow this guide to solve your problem.
Things that you needed
-An OTG Cable
-Working USB type Mouse
-USB Driver,
-And Samsung J701F fix touch not working file.
-Odin tool.
Download Samsung J701F Touch Not working Fix file
Now start to Fix Samsung SM-J701F Touch not working after update problem
-First of all, download all the requires files form here.
-After that, extract all the files on your PC,
-Then connect the USB OTG cable to your device then connect the mouse.
-Now you can easily access your device with Mouse.
-After that, go to settings menu.
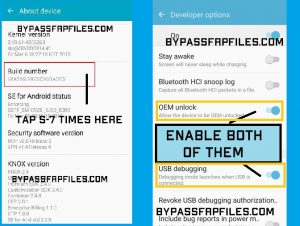
-Then go down and then select “About device” option from there.
-After that, click on the “Software Info”.
-Then there you will found “Build number” option.
-Now click 5-7 times on the “Build Number” until you see “Developer Option is enabled”.
-Now go back to settings main menu.
-There you will see “Developer Option” will added.
-Now open the “Developer Option” menu and then go down.
-and then enable the “USB Debugging mode and OEM unlocking” from there.
-Now power off your device.
Now put your device in download mode to successfully fix Samsung SM-J701F Touch not working after update
Put Samsung J701F in Download Mode
-Power off your device.
-After that, press and hold (Volume down + Home + Power) key until you see “Warning” logo on your device screen.
-Then press the “Volume UP” to confirm the download mode on your device.
-Now your device is successfully boot into download mode.
After that, flash the Samsung J701F fix touch not working file to successfully solve the Samsung SM-J701F Touch not working after update problems.
Now flash the Samsung J7 Nxt touch not fix file
-Now extract the Odin tool on your PC,
-Then open the extracted odin folder.
-After that, find and open the Odin.exe.
-Then click on the “AP” tab and then give the file tab of the extracted “Samsung J701F touch fix file”.
-Now connect your device PC,
-Then on the Odin tool you will see “Added” massage in log in box.
-Then click on the “Start” button in the Odin tool.
-After that, wait for finish.
-When finish, then disconnet your device to PC.
-Now your device will stuck at boot logo.
-Don’t panic, we also have a solution of this problem.
-Congrats guys this is the last procedure to fix Samsung SM-J701F Touch not working after update,
Now Hard Reset Samsung J701F
-First, power off your device.
-Then press and hold (Volume up + Home +Power) key until you see “Android” logo on your device.
-Then press volume up key and power key once then recovery menu will come.
-After that, select the “wipe data and factory reset” from there by using volume up and down key, then tap yes to confirm by use power key .
-Then select “reboot device”.
-Done, wait some time your device will power on and touch will 100% fixed.
check more tutorial-here
Thanks for visiting us, if i help you to Samsung SM-J701F Touch not working after update then share with your friends, or if you face any problems with this then simply comments us below you will solve the problem as early as possible.

